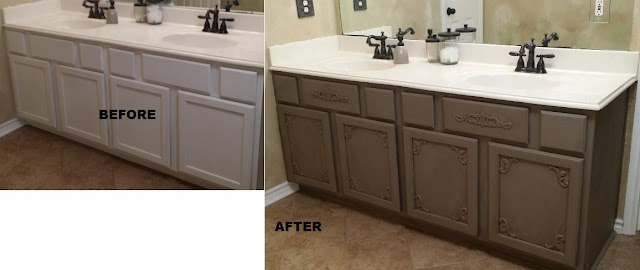
Make your stock contractor cabinet look custom!
The stock cabinet in our master bathroom was white and blah. A little paint and some decorations did wonders for it. Here is what I did.
First, I removed all the hardware off the doors. I put all the doors and drawers on a plastic-covered table in a separate room with plenty of room to work in.
I cleaned everything very well and rinsed it. I found some wood embellishments at Hobby Lobby and glued them on well with wood glue. I used Elmer's Carpenter's Color Change Wood Filler (It is paintable and doesn't stink ) and went around all the edges of each piece with my finger to fill in the crack between the embellishment and the cabinet face. Makes everything looks more finished and custom.
I put 3 coats of Annie Sloan's Coco paint. No sanding, no primer. Just paint. There was no smell with this paint. I loved it!
I put one coat of Acrylic polyurethane in FLAT. You need to put the polyurethane BEFORE you glaze. The chalk paint will suck it up before you can wipe the glaze off and you will cry.
After the polyurethane has dried after about 3 hours, you can glaze. I used some leftover glaze from my front door project. The recipe is Modern Masters Extender with Benjamin Moore paint in a 4 parts extender to 1 part paint. The Paint is shown below the Super Spec D.T.M. Acrylic Low Lustre Bronzetone P25 60. I did not use the wax. This is a bathroom that gets hot and humid. Wax might be OK for a piece of furniture in my living room. Not in the bathroom.
I glazed all the doors. I let dry for 48 hours. Don't skip this step or try to shortcut. The extender makes the paint dry very slowly. If you try before, you will have a mess. After it had dried for the full 48 hours, I put 3 coats of the flat acrylic polyurethane. I put it all back together. Then I squealed with delight. I am so happy with it.
First cabinet door has glaze. Second doesn't.
See what a different the glaze makes to the color and the overall look!
|
Love this!
|
Final product! Super thrilled with the results!
|
Here are the issues I found that you can avoid.
-First, when you are painting, the doors needs to be elevated from the table. My friend suggested little plastic triangles you can get from Home Depot or Lowe's for just such a project. I will do that next time to avoid globs of paint drying on the underside. I was careful, but it still had puddling underneath.
-Next, don't get fancy and try to do cracks and such. It dried into a glob and I had to sand it off. Avoid my mistake.
-Next, while Annie Sloan prides itself on not needing primer, I will put a primer when I do my kitchen cabinets. My husband accidentally chipped off some paint when putting the doors of the master bathroom cabinet back on. Maybe it wasn't completely cured. I'm not taking chances. A primer is a smart step on kitchen cabinets that get a lot of handling.
-I will rent a sprayer for the kitchen cabinets. It will go on quicker and smoother.
The walls are next. I'm attempting a new wall treatment. More later. That giant mirror will be gone soon. I'm replacing it with a neato idea I had. I'll post that soon. Stay tuned!


Comments